Spring Boot REST and Keycloak - Part 2
Today i’m going to show you how to create a simple REST API with Spring Boot. After i’ve create the API i will show you how to secure it with Keycloak.
Spring Boot REST API
Create a new project
First of all we need to create a new project. To do this we can use the Spring Initializr.
To keep this example as simple as possible i will only add the spring web dependency and lombok because i like it.
Create a simple controller
Now we can create a simple controller to test our application.
@RestController
@RequestMapping("/api/authenticated")
public class HelloController {

    @GetMapping
    public List<String> get() {
        return List.of("auth0", "auth1", "auth2");
    }
}
Run the application
Now we can run the application and test it with curl:
$ curl http://localhost:8080/api/authenticated
["auth0","auth1","auth2"]
Adding security dependencies
Now we can add the dependencies to secure our application with Keycloak. My build.gradle file looks like this:
plugins {
    id 'java'
    id 'org.springframework.boot' version '3.2.1'
    id 'io.spring.dependency-management' version '1.1.4'
}

group = 'com.example'
version = '0.0.1-SNAPSHOT'

java {
    sourceCompatibility = '21'
}

configurations {
    compileOnly {
        extendsFrom annotationProcessor
    }
}

repositories {
    mavenCentral()
}

dependencies {
    implementation 'org.springframework.boot:spring-boot-starter-web'
    implementation 'org.springframework.boot:spring-boot-starter-oauth2-client'
    implementation 'org.springframework.boot:spring-boot-starter-security'
    implementation group: 'com.c4-soft.springaddons', name: 'spring-addons-starter-oidc', version: '7.3.0'

    compileOnly 'org.projectlombok:lombok'
    annotationProcessor 'org.projectlombok:lombok'
    testImplementation 'org.springframework.boot:spring-boot-starter-test'
}

tasks.named('test') {
    useJUnitPlatform()
}
Adding security configs
Now we can add the security configs to our application. I will create a new class called WebSecurityConfig:
@Configuration
@EnableMethodSecurity
public  class WebSecurityConfig { }
And i will add the following configurations to my application.yaml file:
server:
  port: 8081

logging:
  level:
    org.springframework.security: DEBUG

com:
  c4-soft:
    springaddons:
      oidc:
        ops:
          - iss: http://localhost:8080/realms/SpringBootKeycloak
            username-claim: preferred_username
            authorities:
              - path: $.realm_access.roles
              - path: $.resource_access.*.roles
        resourceserver:
          permit-all:
            - "/greet/public"
          cors:
            - path: /**
              allowed-origin-patterns: '*'
              allowed-methods: '*'
Role based controllers
I will add to more controllers to test the role based authentication. I will call them Profile1Controller and Profile2Controller. I will bind the routes exposed by those controllers to the /api/profile1 and /api/profile2 routes secured by the roles i had configured in keycloak.
package com.example.demo.controllers;

import jakarta.annotation.security.RolesAllowed;
import lombok.RequiredArgsConstructor;
import org.springframework.security.access.prepost.PreAuthorize;
import org.springframework.web.bind.annotation.GetMapping;
import org.springframework.web.bind.annotation.RequestMapping;
import org.springframework.web.bind.annotation.RequestParam;
import org.springframework.web.bind.annotation.RestController;

import java.util.List;

@RestController()
@RequestMapping("api/profiles1")
@RequiredArgsConstructor
public class Profile1Controller {


    @GetMapping
    @PreAuthorize("hasAnyAuthority('profiles1')")
    public List<String> getProfile(@RequestParam("id") String id) {
        return List.of("thing1", "thing2");
    }

}
package com.example.demo.controllers;

import lombok.RequiredArgsConstructor;
import org.springframework.security.access.prepost.PreAuthorize;
import org.springframework.web.bind.annotation.GetMapping;
import org.springframework.web.bind.annotation.RequestMapping;
import org.springframework.web.bind.annotation.RequestParam;
import org.springframework.web.bind.annotation.RestController;

import java.util.List;

@RestController()
@RequestMapping("api/profiles2")
@RequiredArgsConstructor
public class Profile2Controller {


    @GetMapping
    @PreAuthorize("hasAnyAuthority('profiles2')")
    public List<String> getProfile(@RequestParam("id") String id) {
        return List.of("thing3", "thing4");
    }

}
Call keycloak authentication endpoint
Now we can call the keycloak authentication endpoint to get the access token. To do this we can use curl:
$ curl -X POST \
  http://localhost:8080/realms/SpringBootKeycloak/protocol/openid-connect/token \
  -H 'Content-Type: application/x-www-form-urlencoded' \
  -d 'client_id=login-app&username=user1&password=user1pwd&grant_type=password'
The Keycloak authentication endpoint responds with a JSON object containing the following fields:
access_token: The access token you can use to authenticate your requests.expires_in: The lifetime in seconds of the access token.refresh_expires_in: The lifetime in seconds of the refresh token.refresh_token: The refresh token you can use to get a new access token when the current one expires.token_type: The type of the token, typically “bearer”.not-before-policy: The time before which the token is not valid.session_state: The session state.scope: The scope of the access token.
Here’s an example of a Keycloak authentication response:
{
  "access_token": "eyJhbGciOiJSUzI1NiIsInR5cCIgOiAiSldUIiwia2lkIiA6ICI5dzVHTzYzaE10TDJ3ajJZMzIwNU8yXzZQZ2FLZlRSSmlCWWUxR2pHSnRVIn0.eyJleHAiOjE3MDYwMDc4NjgsImlhdCI6MTcwNjAwNzU2OCwianRpIjoiNzI0ZjM0N2YtNGI3YS00OTFhLTk5MjMtZjQ0MDBhMzRhNTgxIiwiaXNzIjoiaHR0cDovL2xvY2FsaG9zdDo4MDgwL3JlYWxtcy9TcHJpbmdCb290S2V5Y2xvYWsiLCJhdWQiOiJhY2NvdW50Iiwic3ViIjoiYzEyZjY1OWYtNTNmMi00YTkxLTg3NDctMGRjMmFkMjZiOTllIiwidHlwIjoiQmVhcmVyIiwiYXpwIjoibG9naW4tYXBwIiwic2Vzc2lvbl9zdGF0ZSI6IjMzNzc1N2FkLWZlOWYtNGY4YS1hMDk2LTU3ZjM4ODNiYTNlYiIsImFjciI6IjEiLCJhbGxvd2VkLW9yaWdpbnMiOlsiLyoiXSwicmVhbG1fYWNjZXNzIjp7InJvbGVzIjpbInByb2ZpbGVzMSIsImRlZmF1bHQtcm9sZXMtc3ByaW5nYm9vdGtleWNsb2FrIiwib2ZmbGluZV9hY2Nlc3MiLCJ1bWFfYXV0aG9yaXphdGlvbiJdfSwicmVzb3VyY2VfYWNjZXNzIjp7ImFjY291bnQiOnsicm9sZXMiOlsibWFuYWdlLWFjY291bnQiLCJtYW5hZ2UtYWNjb3VudC1saW5rcyIsInZpZXctcHJvZmlsZSJdfX0sInNjb3BlIjoicHJvZmlsZSBlbWFpbCIsInNpZCI6IjMzNzc1N2FkLWZlOWYtNGY4YS1hMDk2LTU3ZjM4ODNiYTNlYiIsImVtYWlsX3ZlcmlmaWVkIjpmYWxzZSwicHJlZmVycmVkX3VzZXJuYW1lIjoidXNlcjEiLCJnaXZlbl9uYW1lIjoiIiwiZmFtaWx5X25hbWUiOiIifQ.j5gDer4CAbfk9tTDQxCI7JwyGzTjYnlM4xGhHI3i2BDvBDIlRC3-KaHlJbrv7r7mY93wHJaAFC8fcmSze0ecj2dYASiZJqclgI9fkbDIg7oR9we3USogSniw1aILh3nqOrH0VA3lcQ7yGAKMMOpKIBxgEC9n56UvwKAXZK0XXUGiup3M-Pj-TypV4S91ryd0gUfjRkP9xVpfpDxF7xizZGP1JAB7-MEtuogOizeYs8Rxb3GhnVo-8qxZccHSQEIAndYTe5EwKeMzQM-f_Ri0EFNaJIQWNN4Cx3BgLbciFq_fPNSfj1T-HvZ3JVfiTsiyd3DVseQUwE07kskKAfC0Yg",
  "expires_in": 299,
  "refresh_expires_in": 1799,
  "refresh_token": "eyJhbGciOiJIUzI1NiIsInR5cCIgOiAiSldUIiwia2lkIiA6ICI4ZmFiMjYzNC01MGE5LTRmNDItYjhiZC0yN2NhMWU2YmM4YzQifQ.eyJleHAiOjE3MDYwMDkzNjgsImlhdCI6MTcwNjAwNzU2OCwianRpIjoiNTc4MGNhMjktZTZlMC00ZGVjLWIxNWEtNTEyNWQ3NDM0MDU4IiwiaXNzIjoiaHR0cDovL2xvY2FsaG9zdDo4MDgwL3JlYWxtcy9TcHJpbmdCb290S2V5Y2xvYWsiLCJhdWQiOiJodHRwOi8vbG9jYWxob3N0OjgwODAvcmVhbG1zL1NwcmluZ0Jvb3RLZXljbG9hayIsInN1YiI6ImMxMmY2NTlmLTUzZjItNGE5MS04NzQ3LTBkYzJhZDI2Yjk5ZSIsInR5cCI6IlJlZnJlc2giLCJhenAiOiJsb2dpbi1hcHAiLCJzZXNzaW9uX3N0YXRlIjoiMzM3NzU3YWQtZmU5Zi00ZjhhLWEwOTYtNTdmMzg4M2JhM2ViIiwic2NvcGUiOiJwcm9maWxlIGVtYWlsIiwic2lkIjoiMzM3NzU3YWQtZmU5Zi00ZjhhLWEwOTYtNTdmMzg4M2JhM2ViIn0.EN4m4Mrz8YId2aNP6cdHqhKsuWoBdtve9bckIkwbH28",
  "token_type": "Bearer",
  "not-before-policy": 0,
  "session_state": "337757ad-fe9f-4f8a-a096-57f3883ba3eb",
  "scope": "profile email"
}
We will use the access_token to authenticate our requests to our API.
Call the API
Now we can call our API with the access_token we got from Keycloak:
curl --location 'http://localhost:8081/api/authenticated' --header 'Authorization: Bearer eyJhbGciOiJSUzI1NiIsInR5cCIgOiAiSldUIiwia2lkIiA6ICI5dzVHTzYzaE10TDJ3ajJZMzIwNU8yXzZQZ2FLZlRSSmlCWWUxR2pHSnRVIn0.eyJleHAiOjE3MDYwMDc4NjgsImlhdCI6MTcwNjAwNzU2OCwianRpIjoiNzI0ZjM0N2YtNGI3YS00OTFhLTk5MjMtZjQ0MDBhMzRhNTgxIiwiaXNzIjoiaHR0cDovL2xvY2FsaG9zdDo4MDgwL3JlYWxtcy9TcHJpbmdCb290S2V5Y2xvYWsiLCJhdWQiOiJhY2NvdW50Iiwic3ViIjoiYzEyZjY1OWYtNTNmMi00YTkxLTg3NDctMGRjMmFkMjZiOTllIiwidHlwIjoiQmVhcmVyIiwiYXpwIjoibG9naW4tYXBwIiwic2Vzc2lvbl9zdGF0ZSI6IjMzNzc1N2FkLWZlOWYtNGY4YS1hMDk2LTU3ZjM4ODNiYTNlYiIsImFjciI6IjEiLCJhbGxvd2VkLW9yaWdpbnMiOlsiLyoiXSwicmVhbG1fYWNjZXNzIjp7InJvbGVzIjpbInByb2ZpbGVzMSIsImRlZmF1bHQtcm9sZXMtc3ByaW5nYm9vdGtleWNsb2FrIiwib2ZmbGluZV9hY2Nlc3MiLCJ1bWFfYXV0aG9yaXphdGlvbiJdfSwicmVzb3VyY2VfYWNjZXNzIjp7ImFjY291bnQiOnsicm9sZXMiOlsibWFuYWdlLWFjY291bnQiLCJtYW5hZ2UtYWNjb3VudC1saW5rcyIsInZpZXctcHJvZmlsZSJdfX0sInNjb3BlIjoicHJvZmlsZSBlbWFpbCIsInNpZCI6IjMzNzc1N2FkLWZlOWYtNGY4YS1hMDk2LTU3ZjM4ODNiYTNlYiIsImVtYWlsX3ZlcmlmaWVkIjpmYWxzZSwicHJlZmVycmVkX3VzZXJuYW1lIjoidXNlcjEiLCJnaXZlbl9uYW1lIjoiIiwiZmFtaWx5X25hbWUiOiIifQ.j5gDer4CAbfk9tTDQxCI7JwyGzTjYnlM4xGhHI3i2BDvBDIlRC3-KaHlJbrv7r7mY93wHJaAFC8fcmSze0ecj2dYASiZJqclgI9fkbDIg7oR9we3USogSniw1aILh3nqOrH0VA3lcQ7yGAKMMOpKIBxgEC9n56UvwKAXZK0XXUGiup3M-Pj-TypV4S91ryd0gUfjRkP9xVpfpDxF7xizZGP1JAB7-MEtuogOizeYs8Rxb3GhnVo-8qxZccHSQEIAndYTe5EwKeMzQM-f_Ri0EFNaJIQWNN4Cx3BgLbciFq_fPNSfj1T-HvZ3JVfiTsiyd3DVseQUwE07kskKAfC0Yg'
[
    "auth0",
    "auth1",
    "auth2"
]
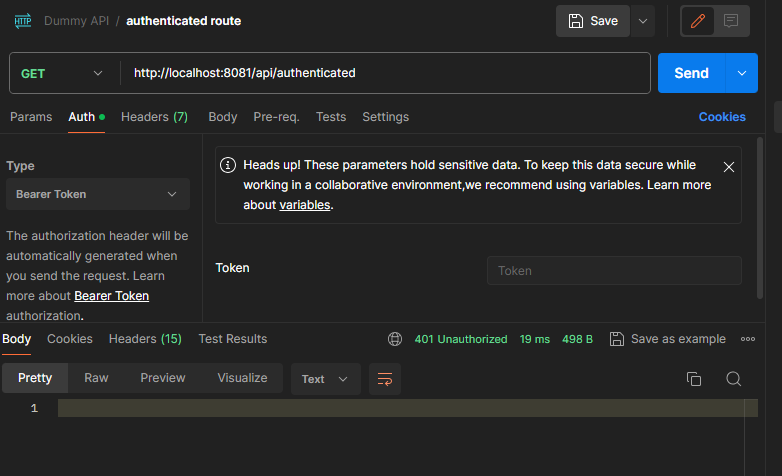
Let’s try to call our api without the access_token:
$ curl --location 'http://localhost:8081/api/authenticated'
We get a 401 Unauthorized response:
Call the role based controllers
Now we can call the role based controllers with the access_token we got from Keycloak:
curl --location 'http://localhost:8081/api/profiles1' \
--header 'Authorization: Bearer eyJhbGciOiJSUzI1NiIsInR5cCIgOiAiSldUIiwia2lkIiA6ICI5dzVHTzYzaE10TDJ3ajJZMzIwNU8yXzZQZ2FLZlRSSmlCWWUxR2pHSnRVIn0.eyJleHAiOjE3MDYwMDgzNzksImlhdCI6MTcwNjAwODA3OSwianRpIjoiODc5YzdlYWUtNmJlZi00YWI1LWIyNDEtMzNmZWNlNzZhODkwIiwiaXNzIjoiaHR0cDovL2xvY2FsaG9zdDo4MDgwL3JlYWxtcy9TcHJpbmdCb290S2V5Y2xvYWsiLCJhdWQiOiJhY2NvdW50Iiwic3ViIjoiYzEyZjY1OWYtNTNmMi00YTkxLTg3NDctMGRjMmFkMjZiOTllIiwidHlwIjoiQmVhcmVyIiwiYXpwIjoibG9naW4tYXBwIiwic2Vzc2lvbl9zdGF0ZSI6IjMzNzc1N2FkLWZlOWYtNGY4YS1hMDk2LTU3ZjM4ODNiYTNlYiIsImFjciI6IjEiLCJhbGxvd2VkLW9yaWdpbnMiOlsiLyoiXSwicmVhbG1fYWNjZXNzIjp7InJvbGVzIjpbInByb2ZpbGVzMSIsImRlZmF1bHQtcm9sZXMtc3ByaW5nYm9vdGtleWNsb2FrIiwib2ZmbGluZV9hY2Nlc3MiLCJ1bWFfYXV0aG9yaXphdGlvbiJdfSwicmVzb3VyY2VfYWNjZXNzIjp7ImFjY291bnQiOnsicm9sZXMiOlsibWFuYWdlLWFjY291bnQiLCJtYW5hZ2UtYWNjb3VudC1saW5rcyIsInZpZXctcHJvZmlsZSJdfX0sInNjb3BlIjoicHJvZmlsZSBlbWFpbCIsInNpZCI6IjMzNzc1N2FkLWZlOWYtNGY4YS1hMDk2LTU3ZjM4ODNiYTNlYiIsImVtYWlsX3ZlcmlmaWVkIjpmYWxzZSwicHJlZmVycmVkX3VzZXJuYW1lIjoidXNlcjEiLCJnaXZlbl9uYW1lIjoiIiwiZmFtaWx5X25hbWUiOiIifQ.qIxAP5G6ryvEa8pfbZnxqNSUPmyWujmzwJ_Ie45t2n3TR52Dc3TaP0qMTBTvsnjflvtiPFEXYIrT6lq8hTAuwqUadF73ppYn1YprPhtq35W_pWHIvkPudLlTHB5ggrKYtaHkyH4_wfA1HVWdrIKeEbamdpzUbIpV-rMbbZxjCQHqndSkL5vHeEsfTEA_O3g6V1QZzvfbJWQcr4UcSKEo963QhiHFkEiyOjvaFTY56NQSU4vlXDo5fOgdGJp8j3Vo8sJg-OFZdpRXf5Tt3XK3_ngfQ8xkzQFHpruTtVJYmMPvbfQGm82zUzSrLcp7bug8VfmlwlinyMFADdO7nOqs6g'
[
    "thing1",
    "thing2"
]
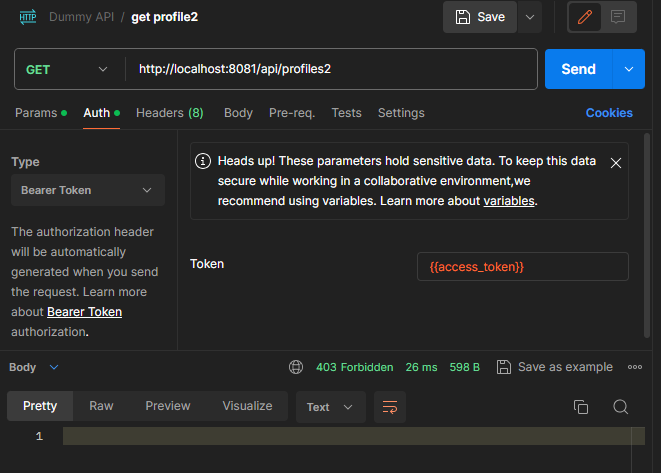
But if we try to call the /api/profiles2 route we get a 403 Forbidden response:
curl --location 'http://localhost:8081/api/profiles2' \
--header 'Authorization: Bearer eyJhbGciOiJSUzI1NiIsInR5cCIgOiAiSldUIiwia2lkIiA6ICI5dzVHTzYzaE10TDJ3ajJZMzIwNU8yXzZQZ2FLZlRSSmlCWWUxR2pHSnRVIn0.eyJleHAiOjE3MDYwMDgzNzksImlhdCI6MTcwNjAwODA3OSwianRpIjoiODc5YzdlYWUtNmJlZi00YWI1LWIyNDEtMzNmZWNlNzZhODkwIiwiaXNzIjoiaHR0cDovL2xvY2FsaG9zdDo4MDgwL3JlYWxtcy9TcHJpbmdCb290S2V5Y2xvYWsiLCJhdWQiOiJhY2NvdW50Iiwic3ViIjoiYzEyZjY1OWYtNTNmMi00YTkxLTg3NDctMGRjMmFkMjZiOTllIiwidHlwIjoiQmVhcmVyIiwiYXpwIjoibG9naW4tYXBwIiwic2Vzc2lvbl9zdGF0ZSI6IjMzNzc1N2FkLWZlOWYtNGY4YS1hMDk2LTU3ZjM4ODNiYTNlYiIsImFjciI6IjEiLCJhbGxvd2VkLW9yaWdpbnMiOlsiLyoiXSwicmVhbG1fYWNjZXNzIjp7InJvbGVzIjpbInByb2ZpbGVzMSIsImRlZmF1bHQtcm9sZXMtc3ByaW5nYm9vdGtleWNsb2FrIiwib2ZmbGluZV9hY2Nlc3MiLCJ1bWFfYXV0aG9yaXphdGlvbiJdfSwicmVzb3VyY2VfYWNjZXNzIjp7ImFjY291bnQiOnsicm9sZXMiOlsibWFuYWdlLWFjY291bnQiLCJtYW5hZ2UtYWNjb3VudC1saW5rcyIsInZpZXctcHJvZmlsZSJdfX0sInNjb3BlIjoicHJvZmlsZSBlbWFpbCIsInNpZCI6IjMzNzc1N2FkLWZlOWYtNGY4YS1hMDk2LTU3ZjM4ODNiYTNlYiIsImVtYWlsX3ZlcmlmaWVkIjpmYWxzZSwicHJlZmVycmVkX3VzZXJuYW1lIjoidXNlcjEiLCJnaXZlbl9uYW1lIjoiIiwiZmFtaWx5X25hbWUiOiIifQ.qIxAP5G6ryvEa8pfbZnxqNSUPmyWujmzwJ_Ie45t2n3TR52Dc3TaP0qMTBTvsnjflvtiPFEXYIrT6lq8hTAuwqUadF73ppYn1YprPhtq35W_pWHIvkPudLlTHB5ggrKYtaHkyH4_wfA1HVWdrIKeEbamdpzUbIpV-rMbbZxjCQHqndSkL5vHeEsfTEA_O3g6V1QZzvfbJWQcr4UcSKEo963QhiHFkEiyOjvaFTY56NQSU4vlXDo5fOgdGJp8j3Vo8sJg-OFZdpRXf5Tt3XK3_ngfQ8xkzQFHpruTtVJYmMPvbfQGm82zUzSrLcp7bug8VfmlwlinyMFADdO7nOqs6g'
Refreshing our access token
The access token we got from Keycloak has a lifetime of 5 minutes. After that we need to refresh it. To do this we can use the refresh_token we got from Keycloak:
curl --location 'http://localhost:8080/realms/SpringBootKeycloak/protocol/openid-connect/token' \
--header 'Content-Type: application/x-www-form-urlencoded' \
--data-urlencode 'client_id=login-app' \
--data-urlencode 'refresh_token=eyJhbGciOiJIUzI1NiIsInR5cCIgOiAiSldUIiwia2lkIiA6ICI4ZmFiMjYzNC01MGE5LTRmNDItYjhiZC0yN2NhMWU2YmM4YzQifQ.eyJleHAiOjE3MDYwMDk4NzksImlhdCI6MTcwNjAwODA3OSwianRpIjoiMmIyM2ZjYTItOTAwZC00ZDlkLTliOWQtMTQxY2Y5ZDU1N2ZkIiwiaXNzIjoiaHR0cDovL2xvY2FsaG9zdDo4MDgwL3JlYWxtcy9TcHJpbmdCb290S2V5Y2xvYWsiLCJhdWQiOiJodHRwOi8vbG9jYWxob3N0OjgwODAvcmVhbG1zL1NwcmluZ0Jvb3RLZXljbG9hayIsInN1YiI6ImMxMmY2NTlmLTUzZjItNGE5MS04NzQ3LTBkYzJhZDI2Yjk5ZSIsInR5cCI6IlJlZnJlc2giLCJhenAiOiJsb2dpbi1hcHAiLCJzZXNzaW9uX3N0YXRlIjoiMzM3NzU3YWQtZmU5Zi00ZjhhLWEwOTYtNTdmMzg4M2JhM2ViIiwic2NvcGUiOiJwcm9maWxlIGVtYWlsIiwic2lkIjoiMzM3NzU3YWQtZmU5Zi00ZjhhLWEwOTYtNTdmMzg4M2JhM2ViIn0.E5DGr1RwnAKB2DIAhOgBTKghrQwKTPGUSmCvk37p0mQ' \
--data-urlencode 'grant_type=refresh_token'
Keycloak will respond with a new set of tokens:
{
  "access_token": "eyJhbGciOiJSUzI1NiIsInR5cCIgOiAiSldUIiwia2lkIiA6ICI5dzVHTzYzaE10TDJ3ajJZMzIwNU8yXzZQZ2FLZlRSSmlCWWUxR2pHSnRVIn0.eyJleHAiOjE3MDYwMDgzNzksImlhdCI6MTcwNjAwODA3OSwianRpIjoiODc5YzdlYWUtNmJlZi00YWI1LWIyNDEtMzNmZWNlNzZhODkwIiwiaXNzIjoiaHR0cDovL2xvY2FsaG9zdDo4MDgwL3JlYWxtcy9TcHJpbmdCb290S2V5Y2xvYWsiLCJhdWQiOiJhY2NvdW50Iiwic3ViIjoiYzEyZjY1OWYtNTNmMi00YTkxLTg3NDctMGRjMmFkMjZiOTllIiwidHlwIjoiQmVhcmVyIiwiYXpwIjoibG9naW4tYXBwIiwic2Vzc2lvbl9zdGF0ZSI6IjMzNzc1N2FkLWZlOWYtNGY4YS1hMDk2LTU3ZjM4ODNiYTNlYiIsImFjciI6IjEiLCJhbGxvd2VkLW9yaWdpbnMiOlsiLyoiXSwicmVhbG1fYWNjZXNzIjp7InJvbGVzIjpbInByb2ZpbGVzMSIsImRlZmF1bHQtcm9sZXMtc3ByaW5nYm9vdGtleWNsb2FrIiwib2ZmbGluZV9hY2Nlc3MiLCJ1bWFfYXV0aG9yaXphdGlvbiJdfSwicmVzb3VyY2VfYWNjZXNzIjp7ImFjY291bnQiOnsicm9sZXMiOlsibWFuYWdlLWFjY291bnQiLCJtYW5hZ2UtYWNjb3VudC1saW5rcyIsInZpZXctcHJvZmlsZSJdfX0sInNjb3BlIjoicHJvZmlsZSBlbWFpbCIsInNpZCI6IjMzNzc1N2FkLWZlOWYtNGY4YS1hMDk2LTU3ZjM4ODNiYTNlYiIsImVtYWlsX3ZlcmlmaWVkIjpmYWxzZSwicHJlZmVycmVkX3VzZXJuYW1lIjoidXNlcjEiLCJnaXZlbl9uYW1lIjoiIiwiZmFtaWx5X25hbWUiOiIifQ.qIxAP5G6ryvEa8pfbZnxqNSUPmyWujmzwJ_Ie45t2n3TR52Dc3TaP0qMTBTvsnjflvtiPFEXYIrT6lq8hTAuwqUadF73ppYn1YprPhtq35W_pWHIvkPudLlTHB5ggrKYtaHkyH4_wfA1HVWdrIKeEbamdpzUbIpV-rMbbZxjCQHqndSkL5vHeEsfTEA_O3g6V1QZzvfbJWQcr4UcSKEo963QhiHFkEiyOjvaFTY56NQSU4vlXDo5fOgdGJp8j3Vo8sJg-OFZdpRXf5Tt3XK3_ngfQ8xkzQFHpruTtVJYmMPvbfQGm82zUzSrLcp7bug8VfmlwlinyMFADdO7nOqs6g",
  "expires_in": 300,
  "refresh_expires_in": 1800,
  "refresh_token": "eyJhbGciOiJIUzI1NiIsInR5cCIgOiAiSldUIiwia2lkIiA6ICI4ZmFiMjYzNC01MGE5LTRmNDItYjhiZC0yN2NhMWU2YmM4YzQifQ.eyJleHAiOjE3MDYwMDk4NzksImlhdCI6MTcwNjAwODA3OSwianRpIjoiMmIyM2ZjYTItOTAwZC00ZDlkLTliOWQtMTQxY2Y5ZDU1N2ZkIiwiaXNzIjoiaHR0cDovL2xvY2FsaG9zdDo4MDgwL3JlYWxtcy9TcHJpbmdCb290S2V5Y2xvYWsiLCJhdWQiOiJodHRwOi8vbG9jYWxob3N0OjgwODAvcmVhbG1zL1NwcmluZ0Jvb3RLZXljbG9hayIsInN1YiI6ImMxMmY2NTlmLTUzZjItNGE5MS04NzQ3LTBkYzJhZDI2Yjk5ZSIsInR5cCI6IlJlZnJlc2giLCJhenAiOiJsb2dpbi1hcHAiLCJzZXNzaW9uX3N0YXRlIjoiMzM3NzU3YWQtZmU5Zi00ZjhhLWEwOTYtNTdmMzg4M2JhM2ViIiwic2NvcGUiOiJwcm9maWxlIGVtYWlsIiwic2lkIjoiMzM3NzU3YWQtZmU5Zi00ZjhhLWEwOTYtNTdmMzg4M2JhM2ViIn0.E5DGr1RwnAKB2DIAhOgBTKghrQwKTPGUSmCvk37p0mQ",
  "token_type": "Bearer",
  "not-before-policy": 0,
  "session_state": "337757ad-fe9f-4f8a-a096-57f3883ba3eb",
  "scope": "profile email"
}
Conclusion
In this article we saw how to secure a Spring Boot REST API with Keycloak. We saw how to configure Keycloak and how to use the Spring Boot Keycloak Spring Security Adapter to secure our API. We also saw how to use the access_token to call our API and how to refresh the access_token when it expires.
The full coded example can be found on my GitHub :-D
https://github.com/AndreaNicola/springboot-keycloak-api-integration.git
Bye!!